
3D Visualization: POV-Ray
General information
The
Persistence Of Vision Ray-tracer creates three-dimensional,
photo-realistic images using a rendering technique called
ray-tracing. It reads in a text file containing information
describing the objects and lighting in a scene and generates an image
of that scene from the view point of a camera also described in the
text file.
Ray-tracing is a rendering technique that calculates an
image of a scene by simulating the way rays of light travel in the
real world. The POV-Ray package includes detailed instructions on
using the ray-tracer and creating scenes.
(from
http://www.povray.org/documentation/)
Features:
Supports multiple platforms (binaries and source)
Visualization and animation in 3D with numerous light settings, atmospheric effects and media interaction
Uses an easy to use scene description language (supporting macros and loops), INI files and density files
Very high quality output image files
External links:
3D Visualization: Overview
Evaluation
|
Installability |
# # # # # |
|
Functionality |
# # # # # |
|
Usability |
# # # # # |
|
Adaptability |
# # # # # |
|
Overall |
# # # # # |
POV-Ray can only be build from
source, additional tools are not required. The ray-tracer can be used
in multiple ways, one is for the visualization of 3D scalar fields on
a structured grid via DF3 density files. The scene description
language allows you to create a volume containing the density field
which is pictured due to its defined properties (colour, emission,
absorption, ...). The cloud-like results within the scene is seen
from the cameras point of view an can additional be illuminated by
light sources. It is quite demanding to get started but with some
experience you can put your data on scene with high quality
results.
POV-Ray runs only on the graphics hardware of a single
computers. Its current version is 3.6 (in July 2010), but POV-Ray is
still under active development; Linux version 3.6 has been tested.
Additional pros:
Vast online documentation (with example files)
Direct access to plotting preferences (e.g. antialiasing)
Reads INI files (with global settings for several projects)
Active development
Oodles of web submissions
Cons:
No GUI
No data analysis
Time-consuming rendering for high definition output
How-to
In the following a simple introduction is given covering the installation procedure, the data file creation, the scripting in a scene description language and the necessary running commands.
How-to: Install
POV-Ray can be downloaded at http://www.povray.org/download/ for Linux, Mac OS or Windows. The source code is also available for these platforms.
The POV-Ray installation as administrated user is simple, a detailed step by step instruction for Linux users can be found at http://www.povray.org/download/linux.php.
Non-administrated users may proceed in the following way:
Download the source code in a temporary directory (e.g. ~/povrayTEMP/) which can be removed after installing and change into it.
~> cd povrayTEMP/
Unpack the distribution and change into the new directory. There are an INSTALL and a README file with further detailed information.
~/povrayTEMP>
tar -xvfz povray-3.6.tar.gz
~/povrayTEMP> cd povray-3.6/
Configure the install path (e.g. ~/INSTALLDIR/povray/) and name your email address for your own compilation.
~/povrayTEMP/povray-3.6> configure COMPILED_BY=local@domain.net --prefix=~/INSTALLDIR/povray/
Finally install POV-Ray.
~/povrayTEMP/povray-3.6> make check install
How-to run POV-Ray is explained in the end of this section (next to last point) after you created your POV and INI file(s).
How-to: Script
This How-to is as from now on assuming you have data of a scalar field on a structured grid.
First you have to create a
DF3 density file from your data
(MYDF3FILE.df3).
DF3
files contain a 6 bytes header (3 times 2 bytes, e.g.
3 short
ints)
defining the grids
dimensions, followed by the scalars each 4 bytes in size which are
ordered increasing
x, then y, and finally z. POV-Ray checks the DF3 files size as well
as the header and reports an error in case of a mismatch.
Here is a C++ code example how to do so knowing the density DATA[x][y][z] (of type double) and the dimensions NX, NY and NZ (all of type short int) of the grid. The data's range is rescaled to an integer interval between 0 and 2.147.483.647 and then written to a binary file (MYDF3FILE.df3) in 'blocks' (with increasing x, then y, then z).
#include
<fstream>
#include <algorithm>
// Define your
scalars DATA[x][y][z] and dimensions NX, NY and NZ here!
file
*DF3FILE;
if((DF3FILE = fopen("MYDF3FILE.df3","wb"))==NULL)
return(1);
fputc( (NX >> 8) & 0xFF,
DF3FILE);
fputc( NX &
0xFF, DF3FILE);
fputc( (NY >> 8) & 0xFF,
DF3FILE);
fputc( NY &
0xFF, DF3FILE);
fputc( (NZ >> 8) & 0xFF,
DF3FILE);
fputc( NZ &
0xFF, DF3FILE);
float
MAXIMUM=static_cast<float>(DATA[0][0][0]),MINIMUM=static_cast<float>(DATA[0][0][0]);
for
(int z=0; z<NZ; z++)
{ for (int y=0; y<NY;
y++)
{ for (int x=0; x<NX;
x++)
{ MAXIMUM=max(static_cast<float>(DATA[x][y][z]),MAXIMUM);
MINIMUM=min(static_cast<float>(DATA[x][y][z]),MAXIMUM);
}
}
}
for
(int z=0; z<NZ; z++)
{ for (int y=0; y<NY;
y++)
{ for (int x=0; x<NX;
x++)
{ int
VALUE=static_cast<int>(2147483647*(DATA[x][y][z]-MINIMUM)/(MAXIMUM-MINIMUM));
fputc(
(VALUE >> 24) & 0xFF, DF3FILE);
fputc(
(VALUE >> 16) & 0xFF, DF3FILE);
fputc(
(VALUE >> 8) & 0xFF,
DF3FILE);
fputc( VALUE &
0xFF, DF3FILE);
}
}
}
fclose(DF3FILE);
Note: This code uses the little endian convention. For a big endian conversion invert the order of the fputc()s for each variable.
Secondly write a POV file (MYPOVFILE.pov) to set up your scene. Open new file with your editor of choice and insert the following (C-like) components:
Every scene needs global_settings and a camera, the additional light_source is optional. For a detailed discussion of each command please check the POV-Ray documentation.
#declare
NX = ; //
x-dimension
#declare NY
= ; //
y-dimension
#declare NZ
= ; //
z-dimension
#declare DIAG =
<NX,NY,NZ>;
global_settings
{ ambient_light
<1,1,1>
assumed_gamma
1
}
camera
{ location <0,-7/4*NY,2/3*NZ>
up
z
right
x //
default: 4/3*x
sky <0,0,1>
look_at
<0,0,0>
}
light_source
{ <2*NX,-NY,2*NZ>
color
rgb <1,1,1>
media_interaction
on
media_attenuation on
shadowless
}
Hint: There are several interesting projection possibilities, e.g. the super-fisheye view.
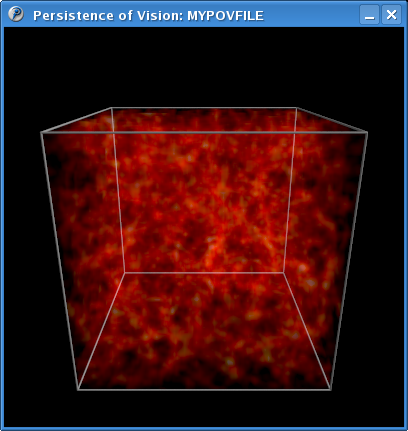
Next comes the declaration of the density field out of the DF3 file and a box filled with the density medium (with the origin of the coordinate system in its center, what becomes handy while animating the scene).
#declare
DENS =
interior
{ media
{ intervals
100 //
number of ray-intervals
ratio
0.5
samples
3,3 //
maximum,minimum of samples per voxel
method
3 //
1, 2 or 3 (3 requires samples 3,3)
emission
3*<1,1,1>/100
absorption
<1,1,1>/1000
scattering
{ 1, <0,0,0> }
confidence
0.999 //
default: 0.9
variance
1/10000 //
default:
1/128
density
{ density_file
df3 "MYDF3FILE.df3"
interpolate
1
color_map //
colour map with (smooth) linear
transition(s)
{ [0.0
rgb <0.0,0.0,0.0>] // 0.0 ~
'black'
[0.2
rgb <1.0,1.0,1.0>] // 0.2 ~
'white'
}
}
}
}
box
{ <0,0,0>,
<1,1,1>
pigment { rgbt <0,0,0,1>
}
hollow
interior { DENS
}
scale DIAG
translate
-DIAG/2
//rotate
<0,0,360*clock> //
rotation around z-axis
}
Note: The colour map specified above maps your scalars field to an interval between 0 and 1 associated with a smooth linear transition from 'black' (invisible) to white. Adjusting the values and colours (in RGB convention) the transition can be hard and vary across a large palette, nevertheless between neighbours the transition will always be linear.
Hint: For a test plot a low number of intervals and samples (as well as a lower resolution) is advisable.
Optional you can now add an frame around the box for orientation.
#declare
RADIUS = 0.2;
#declare FRAME = texture
{ pigment
{ rgb <0.5,0.5,0.5> }
}
union
{ sphere
{ <00,00,00>, RADIUS texture { FRAME } }
sphere
{ <NX,00,00>, RADIUS texture { FRAME } }
sphere
{ <NX,NY,00>, RADIUS texture { FRAME } }
sphere
{ <00,NY,00>, RADIUS texture { FRAME } }
sphere
{ <00,00,NZ>, RADIUS texture { FRAME } }
sphere
{ <NX,00,NZ>, RADIUS texture { FRAME } }
sphere
{ <NX,NY,NZ>, RADIUS texture { FRAME } }
sphere
{ <00,NY,NZ>, RADIUS texture { FRAME } }
translate
-DIAG/2
//rotate
<0,0,360*clock> //
rotation around z-axis
}
union
{ cylinder {
<00,00,00>, <NX,00,00>, RADIUS texture { FRAME }
}
cylinder { <NX,00,00>, <NX,NY,00>,
RADIUS texture { FRAME } }
cylinder {
<NX,NY,00>, <00,NY,00>, RADIUS texture { FRAME }
}
cylinder { <00,NY,00>, <00,00,00>,
RADIUS texture { FRAME } }
cylinder {
<00,00,00>, <00,00,NZ>, RADIUS texture { FRAME }
}
cylinder { <NX,00,00>, <NX,00,NZ>,
RADIUS texture { FRAME } }
cylinder {
<NX,NY,00>, <NX,NY,NZ>, RADIUS texture { FRAME }
}
cylinder { <00,NY,00>, <00,NY,NZ>,
RADIUS texture { FRAME } }
cylinder {
<00,00,NZ>, <NX,00,NZ>, RADIUS texture { FRAME }
}
cylinder { <NX,00,NZ>, <NX,NY,NZ>,
RADIUS texture { FRAME } }
cylinder {
<NX,NY,NZ>, <00,NY,NZ>, RADIUS texture { FRAME }
}
cylinder { <00,NY,NZ>, <00,00,NZ>,
RADIUS texture { FRAME } }
translate
-DIAG/2
//rotate
<0,0,360*clock> //
rotation around z-axis
}
Thirdly it is advisable to write an INI file (MYINIFILE.ini) to determine another set of preferences. Therefor open another blank document with your editor of choice.
Now you can specifiy the following options. For a detailed discussion of each command please check the POV-Ray documentation.
Input_File_Name=MYPOVFILE.pov ;
input file name(s)
;Library_Path=
+W400
+H400 ;
resolution: W(idth) times
H(ight)
Display=on
Quality=9 ;
0 .. 11 (best), default:
9
Bounding=on
;Bounding_Threshold=25
Light_Buffer=on ;
(requires bounding
on)
Vista_Buffer=on ;
(requires bounding
on)
Antialias=on
Sampling_Method=1 ;
1 or 2 (both adaptive, 2
recursive)
Antialias_Threshold=0.1 ;
Antialias_Depth=6 ;
1 .. 9 (best), default:
6
Jitter=on ;
Jitter_Amount=1.0 ;
0.0 .. 1.0
(best)
Field_Render=off
Output_to_File=on
Output_File_Type=N ;
N for
PNG
Output_Alpha=off
Bits_per_Color=16 ;
8 .. 16 for PNG
;Output_File_Name=
If you intend to animate your data add the following lines. This activates the global variable clock running form 0 to 1 in the number of steps defined via initial and final frame. POV-Ray will then plot a PNG for each step which can be animated using a third party tool.
Initial_Frame=0
Final_Frame=36
Initial_Clock=0
Final_Clock=1
Note: It is recommended to adjust the frames and always let clock run from 0 to 1.
How-to: Run
Run POV-Ray from the location of your POV and INI files (e.g. ~/MYFILES/) by executing the following commands.
~>
cd MYFILES/
~/MYFILES> ~/INSTALLDIR/povray/bin/povray MYINIFILE
or
~/MYFILES> ~/INSTALLDIR/povray/bin/povray MYPOVFILE.pov
Now vary the settings and values to your satisfaction, especially the colour map is to be handled with sensitiveness.
Congratulations! You can now call yourself a POV-Ray user.
by
Marco Selig